In this topic
- Introduction
- How do I configure the Deputy/Ready pay (powered by ePayroll) integration?
- Exporting your payroll data from Deputy
- Uploading the export file into Ready pay (powered by ePayroll)
- Common Import Errors
Introduction
This topic describes how an employer can integrate Deputy with Ready pay (powered by ePayroll).
Deputy is a third party time capture and award interpretation application.
Interpreted timesheet data can be exported from Deputy into Ready pay (powered by ePayroll) for processing each pay period.
Note: The following information is provided as is and is provided only in the interest of trying to assist you as much as possible as a valued client. However, as Deputy is a third party product we’re not experts on its use and can’t easily keep abreast of any changes that Deputy may make within their system from time to time. Should you have difficulty following this documentation, please seek the assistance of Deputy’s customer experience team and advise us if changes are required to this documentation.
How do I configure the Deputy/Ready pay (powered by ePayroll) integration?
The Deputy integration is a flatfile integration. The flat file contains a row for each payment that needs to be made, including:
- The employee code of the employee the payment relates to
- The cost centre that the payment needs to be allocated to
- The paycode that the payment relates
- The number of units/hours for the payment
To configure the Deputy integration, you may need to update the your Employee, Cost Centre and Paycode codes in Deputy so that they match those in Ready pay (powered by ePayroll).
To obtain a list of the codes for your Ready pay (powered by ePayroll) account, please contact the ePayroll Support Team to request a Payroll Upload Codes report. If you have more than one employer, the codes will likely be different for each one so you will require a report for each employer.
Updating your employee codes in Deputy
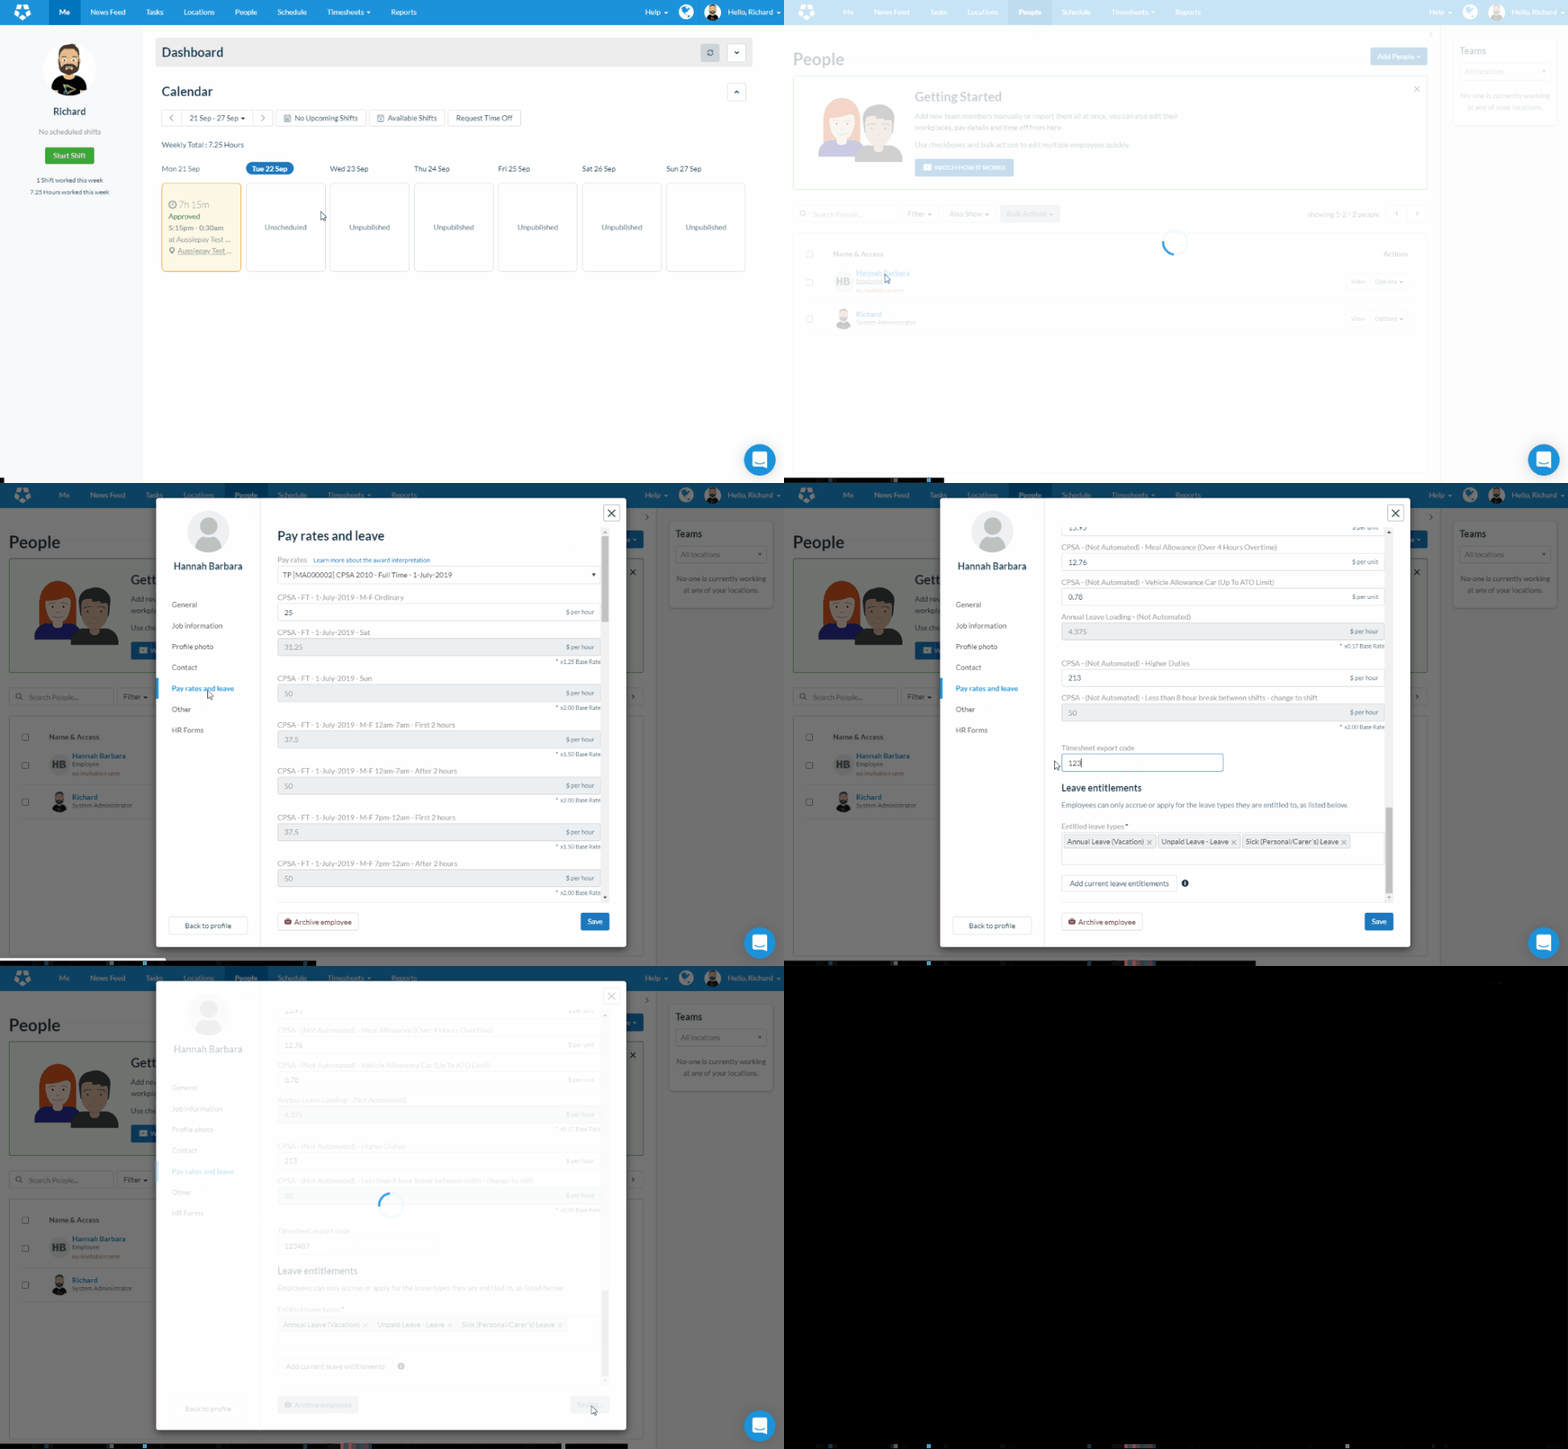
To update your employee codes in Deputy, from the Home screen:
- Choose People from the header menu
- Click the Name of the person you want to edit
- Click the Edit Profile button
- Choose Pay rates and leave from the sidebar menu
- Enter the employee code at the Timesheet export code field
- Click Save
Note: Your employee codes may already be in Deputy, especially if you provided them to us during implementation.
Updating your cost centre codes in Deputy
Did you know? In Deputy, cost centres are called Areas.
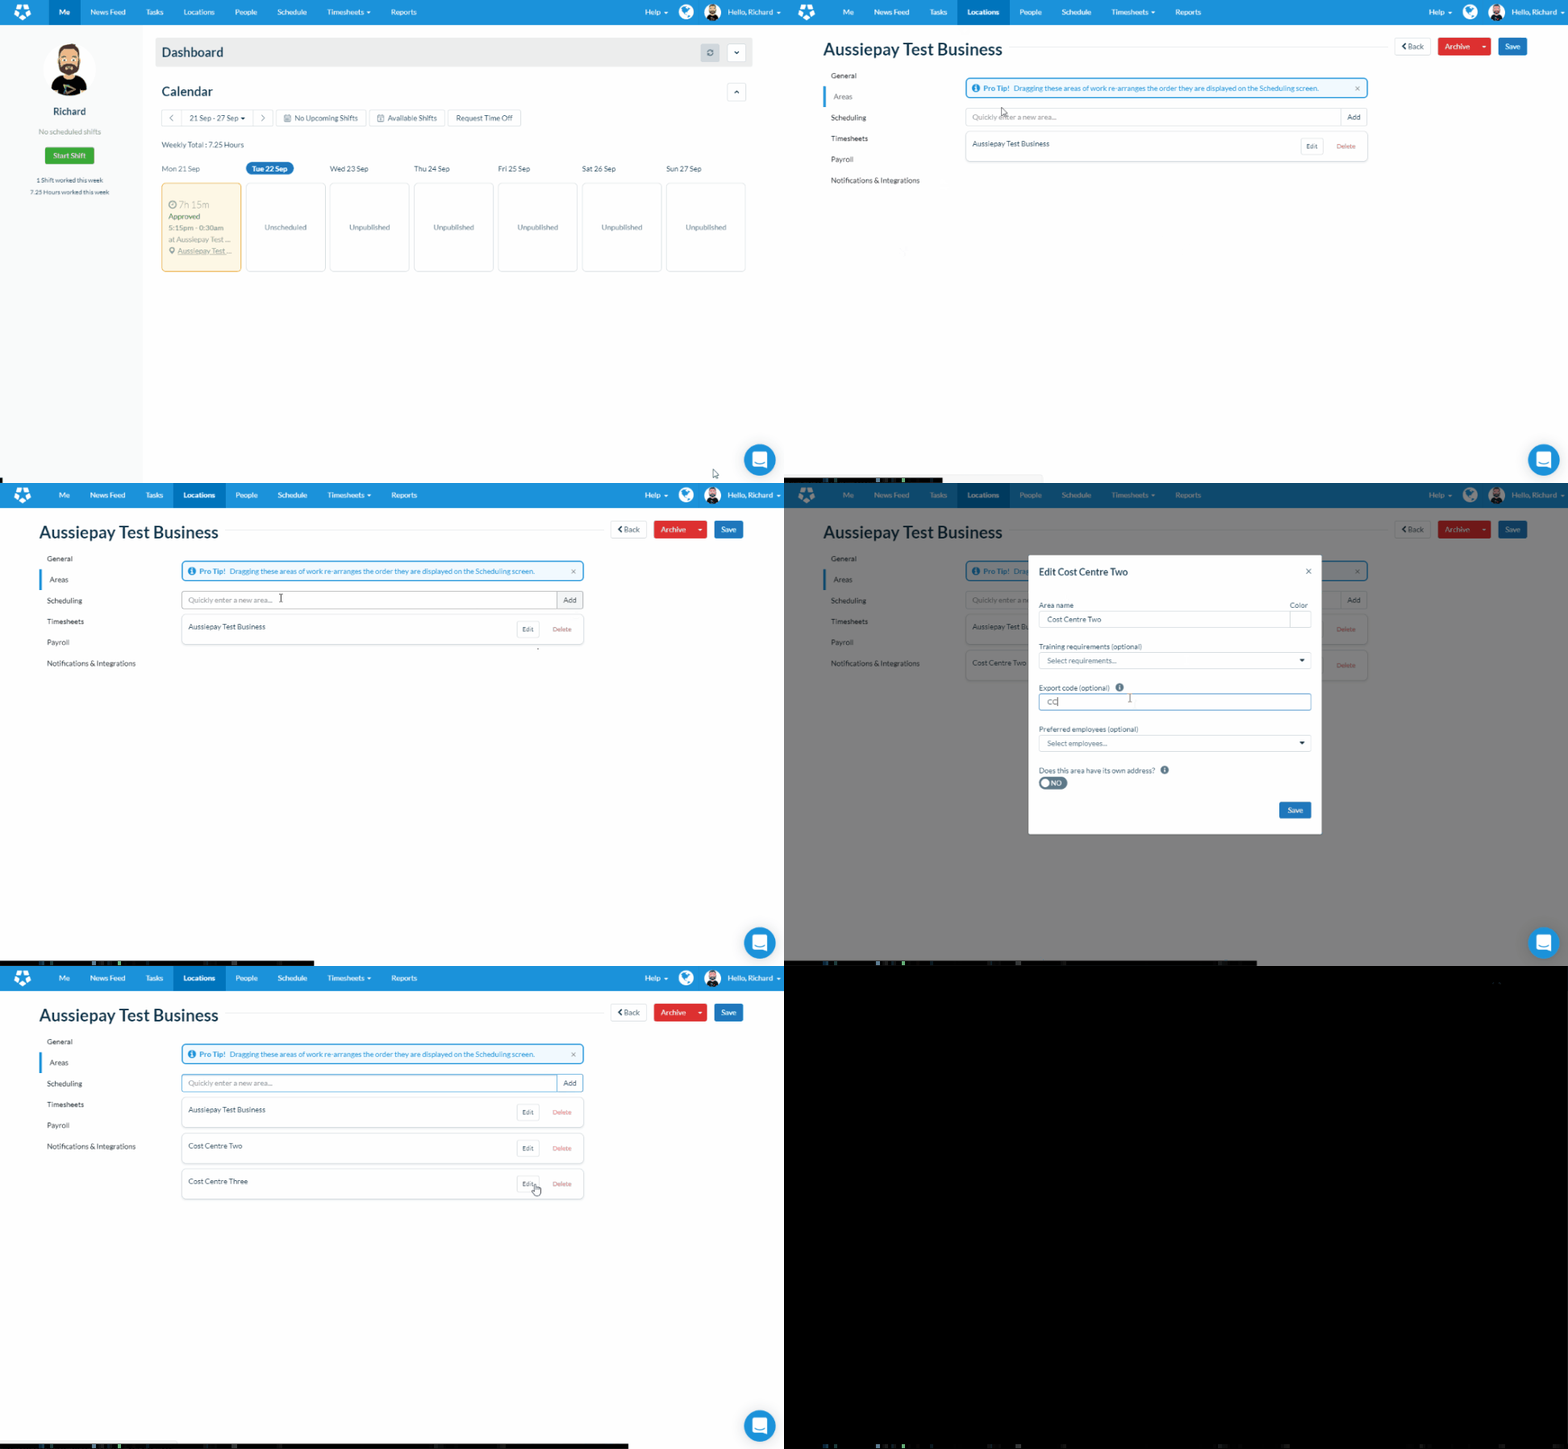
To update your cost centre codes in Deputy, from the Home screen:
- Choose Locations from the header menu
- Click the Areas menu item from the sidebar menu
- Click the Edit button next to the area whose cost centre code you need to review/edit
- Enter the Cost Centre code from Ready pay (powered by ePayroll) into the Export Code (optional) field
- Click Save
Updating your paycode codes in Deputy
Deputy has two concepts that are similar to Ready pay (powered by ePayroll)’s paycodes:
- Leave Rules (where you can update the codes for various leave types)
- Pay Rates (where you can update the codes for other payment types like overtime, ordinary hours, etc).
You may need to make changes to both of these.
Updating Codes for Leave Rules
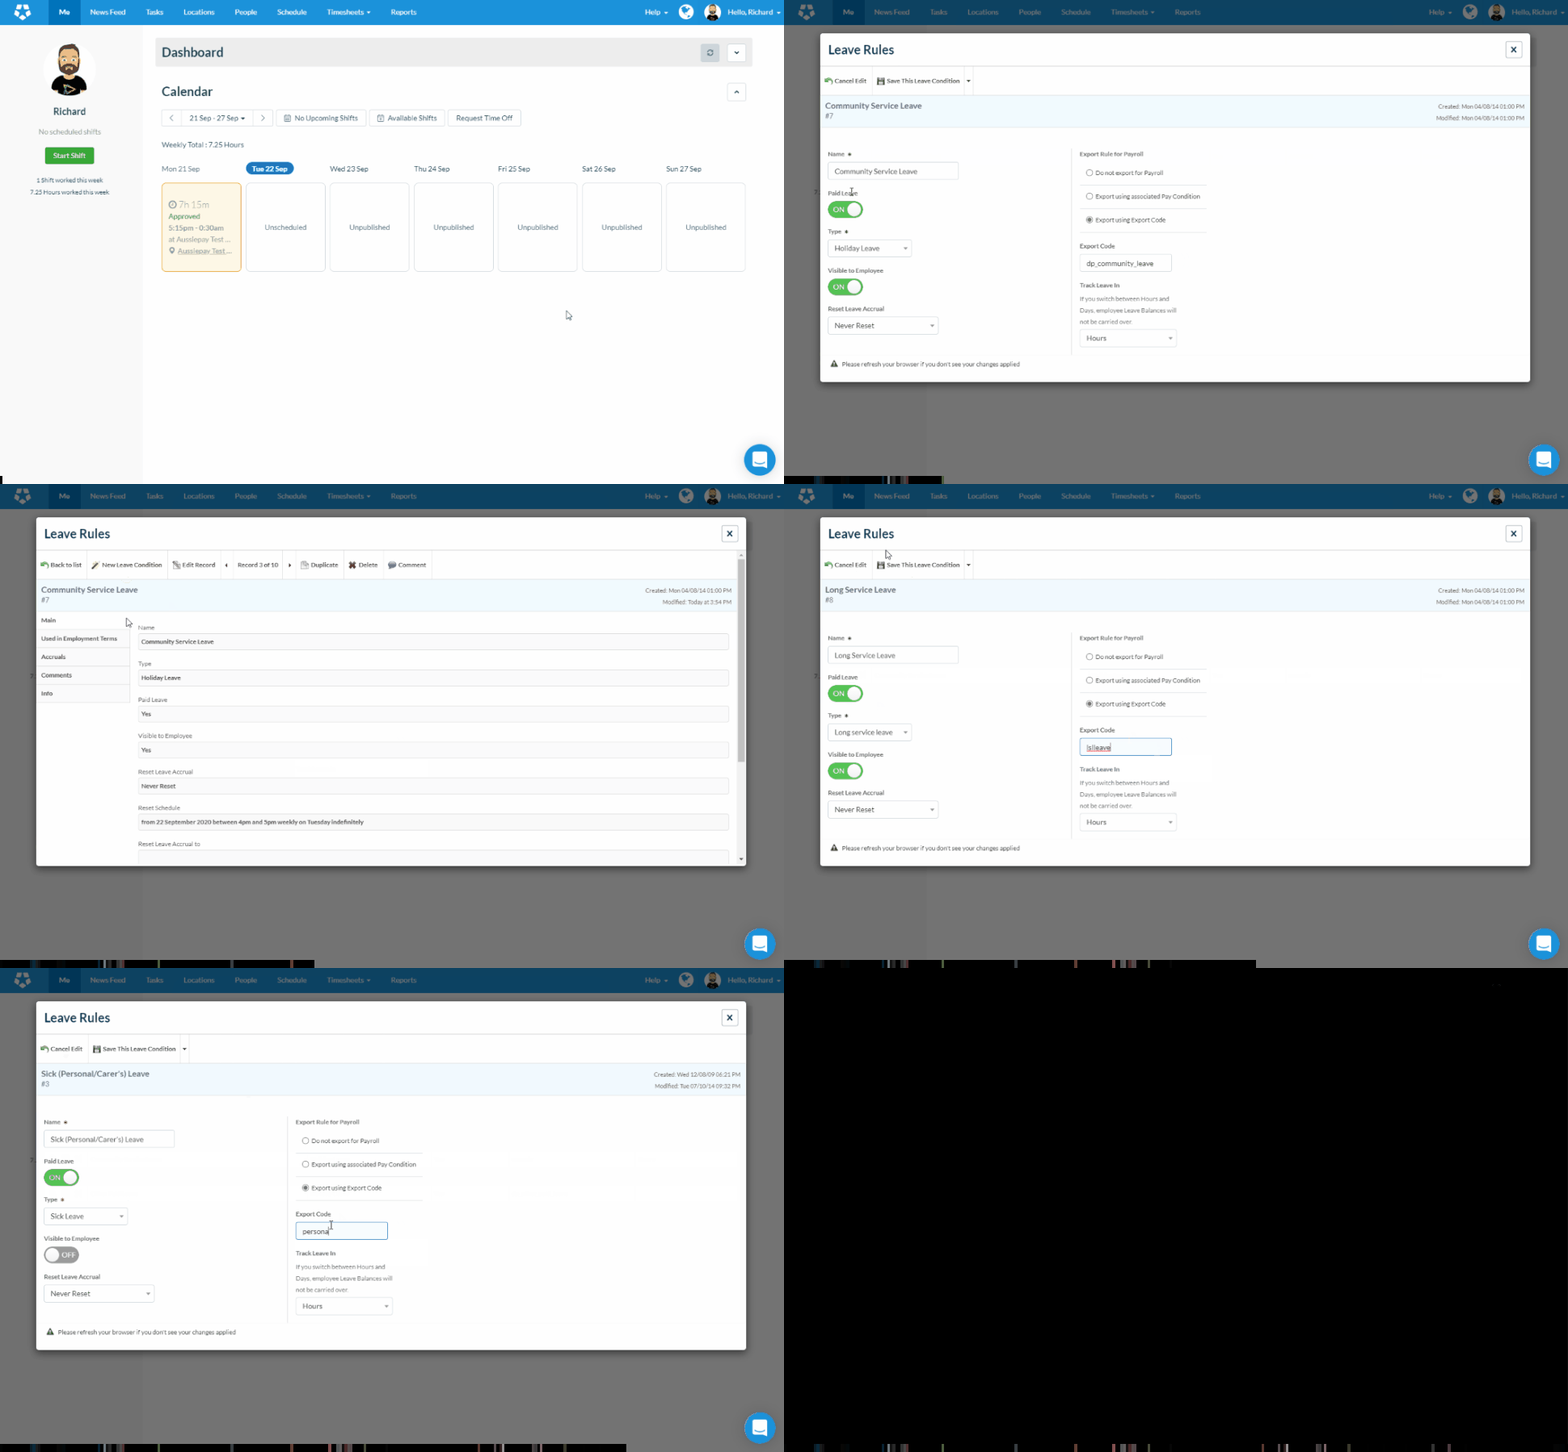
To update the codes for the Leave Rules:
- From the user menu at the top right, choose Global Settings
- Click the Leave tab if it is not already selected
- Click the Edit icon next to the leave type that you need to changes
- Update the Export Code field with the relevant paycode ID from Ready pay (powered by ePayroll)
- Click the Save this Leave Condition button
- Click the Back to List button to continue editing other leave types.
Updating Codes for Pay Rates
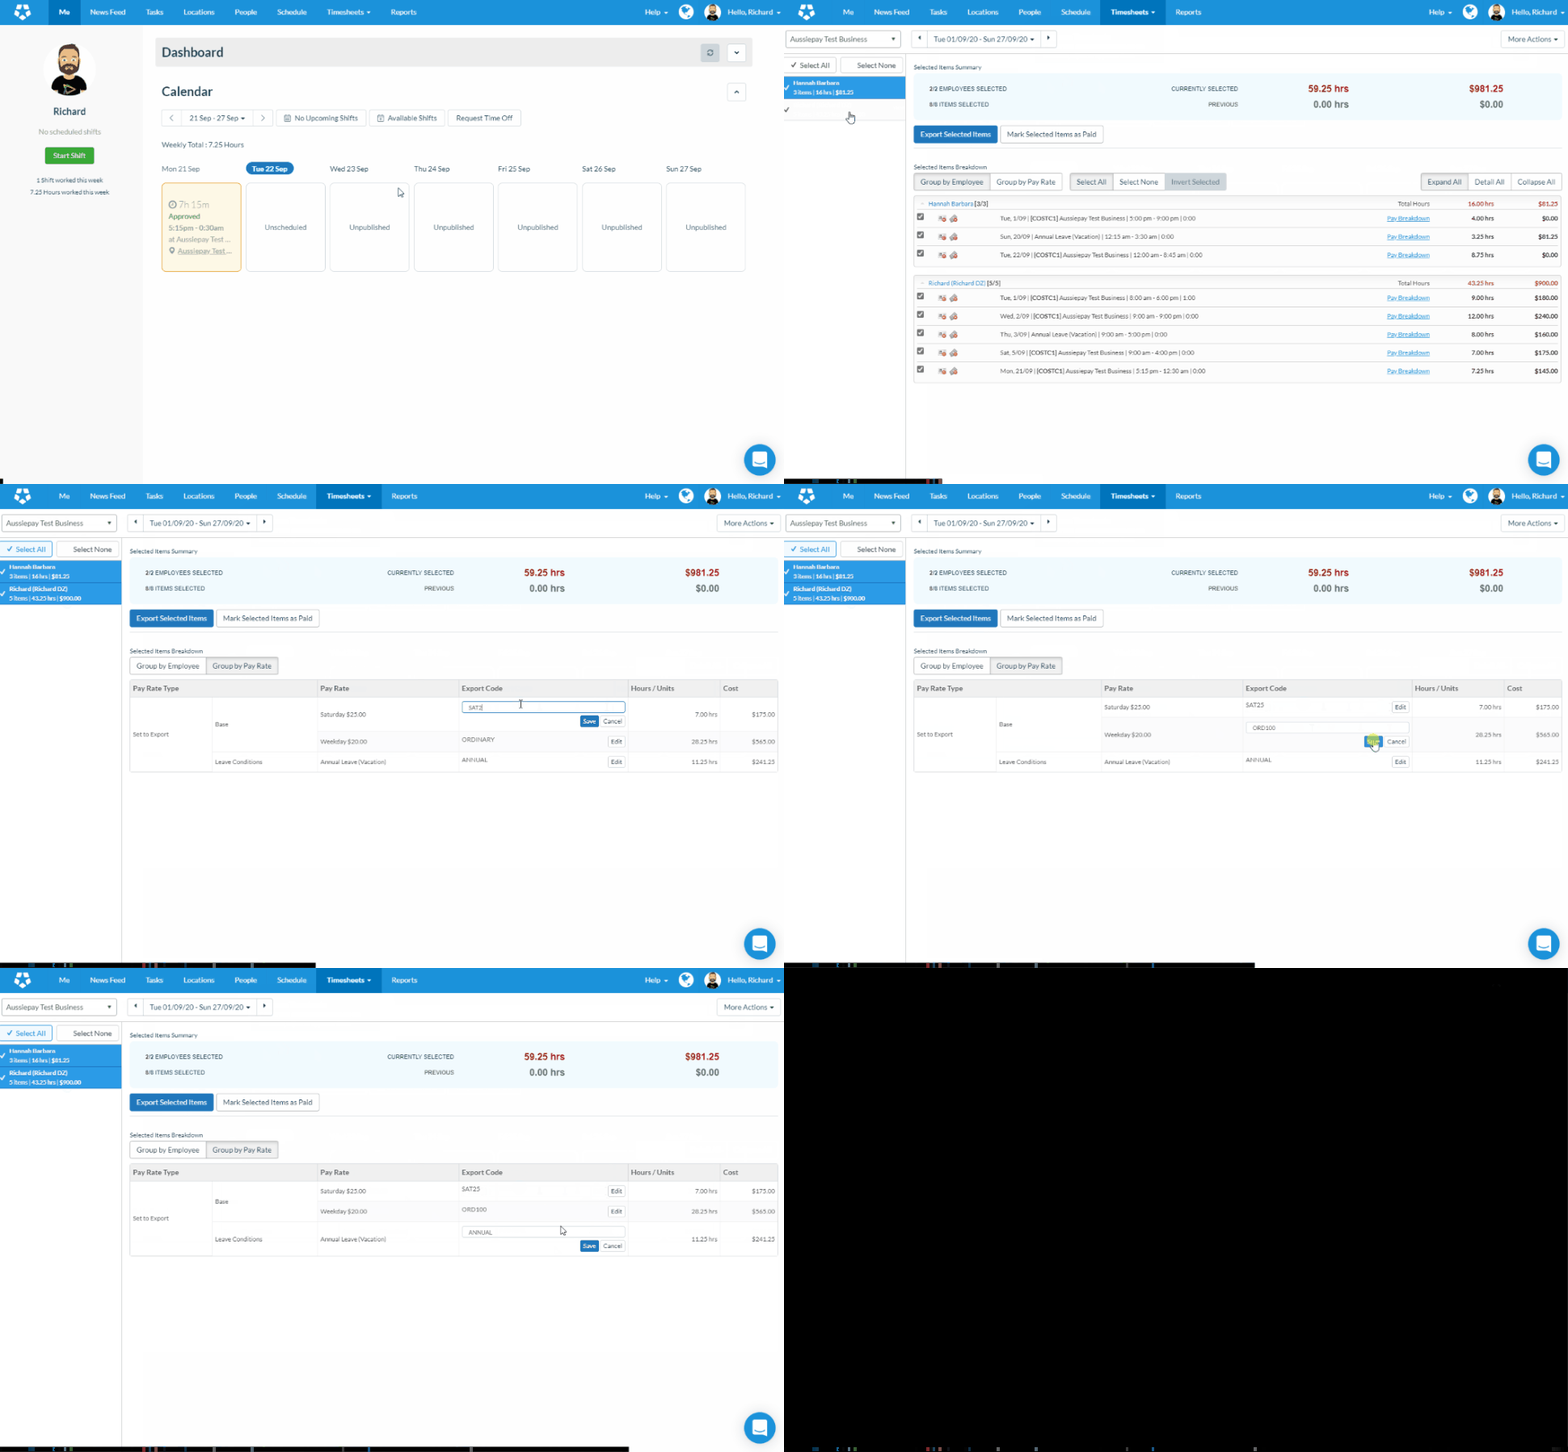
To update the codes for the pay rates, from the Home screen:
- Click the Timesheets -> Export Timesheets menu item
- Click the Select All button on the left hand side to choose all employee’s timsheets
- Click the Group by Pay Rate button to group the timesheet data by the relevant pay rates
- In the Export Code column, click the Edit button next to the pay rate whose code needs to be changed
- Update the Export Code field to match the relevant paycode ID from Ready pay (powered by ePayroll)
- Click the Save button
Exporting your payroll data from Deputy
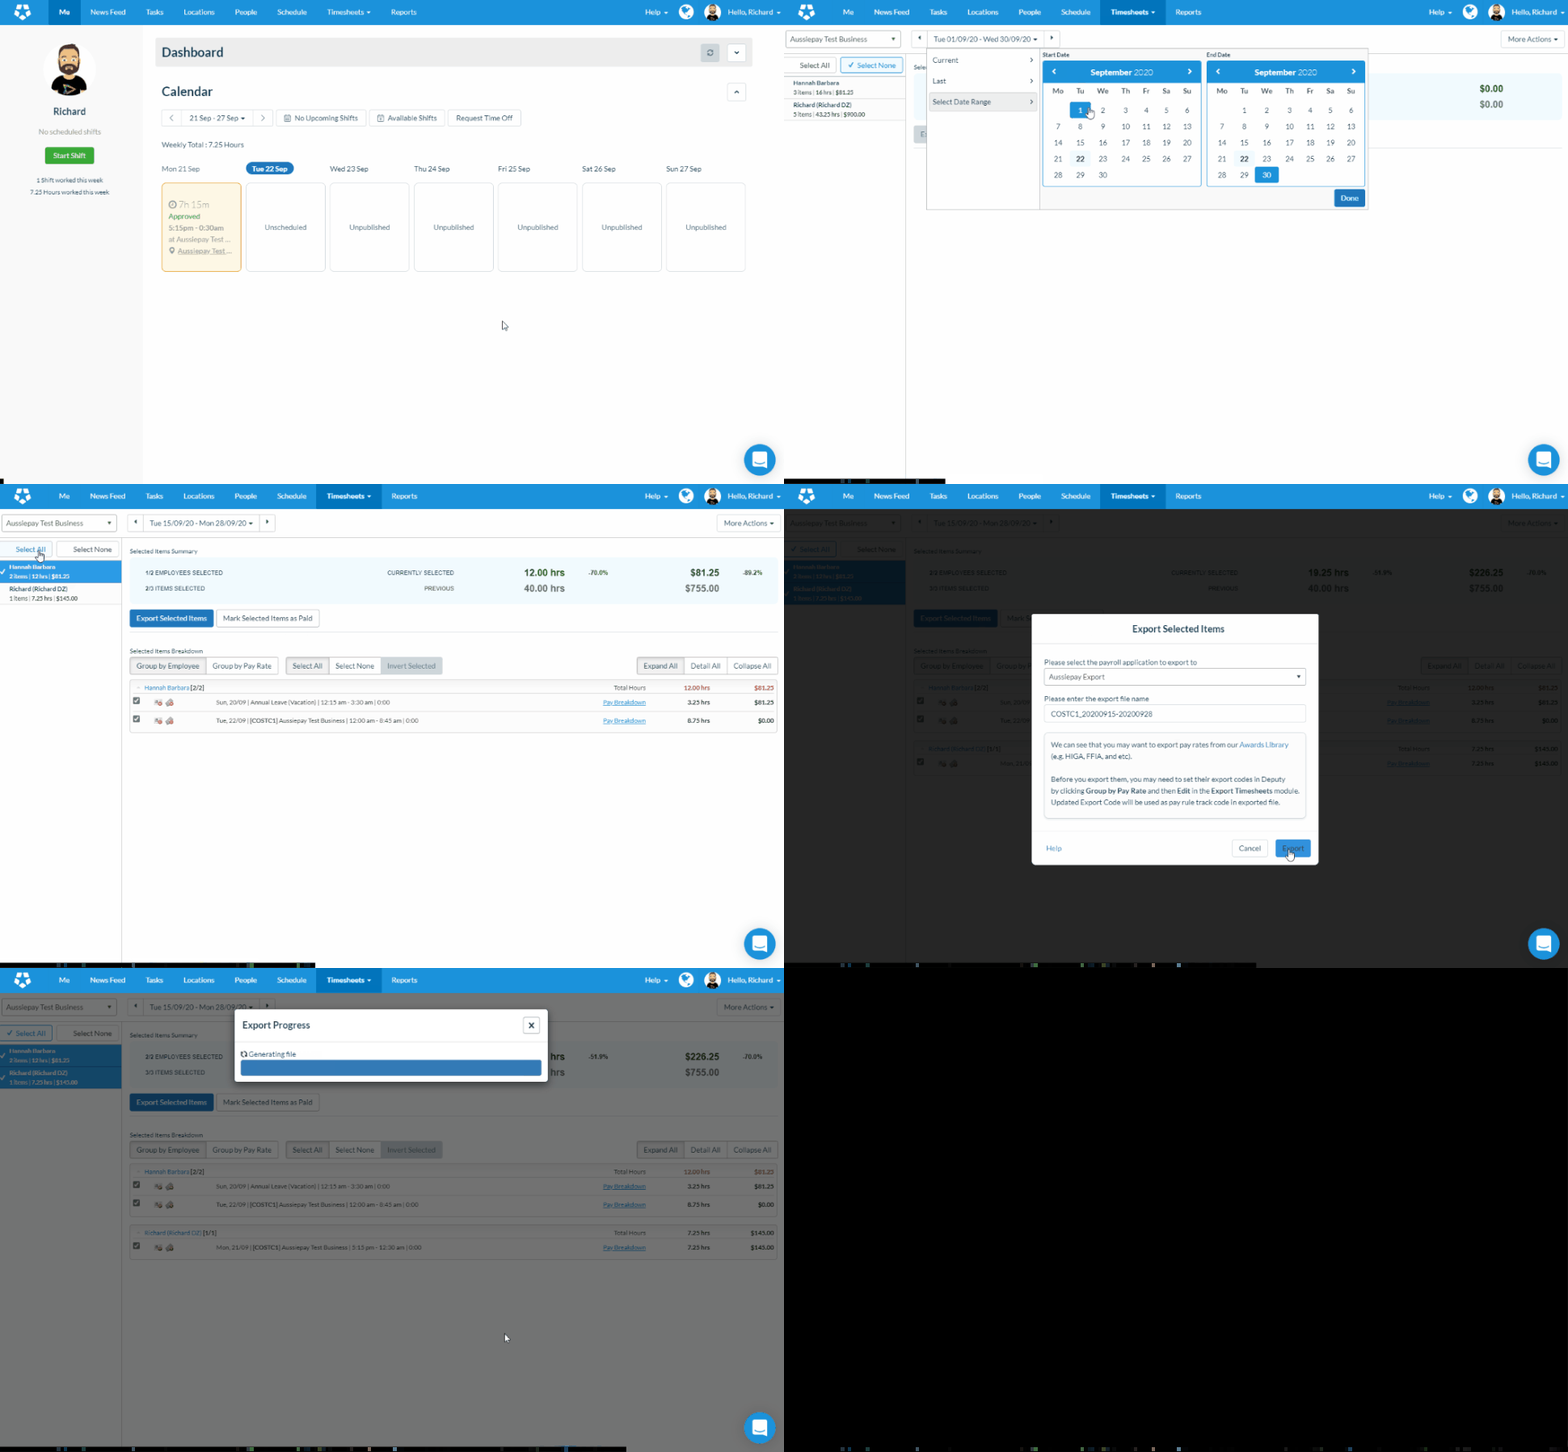
To export your payroll data for processing in Ready pay (powered by ePayroll), from the Home screen:
- Click the Timesheets -> Export Timesheets menu item
- Choose the Date Range for the timesheets that you want paid in the payroll
- Click the Select All button on the left hand side to choose all employee’s timsheets or individually choose employees with timesheets to pay
- Click the Export Selected Items button
- Ensure that Aussiepay Export is selected in the format dropdown
- Click the Export button to download a file to be imported into Ready pay (powered by ePayroll)
Note: It is important that the export file is never edited in Excel as doing so can corrupt the file. Should you need to edit the file, you should use a plain text editor like Notepad or Notepad++. We do not recommend editing the export file manually.
Uploading the export file into Ready pay (powered by ePayroll)
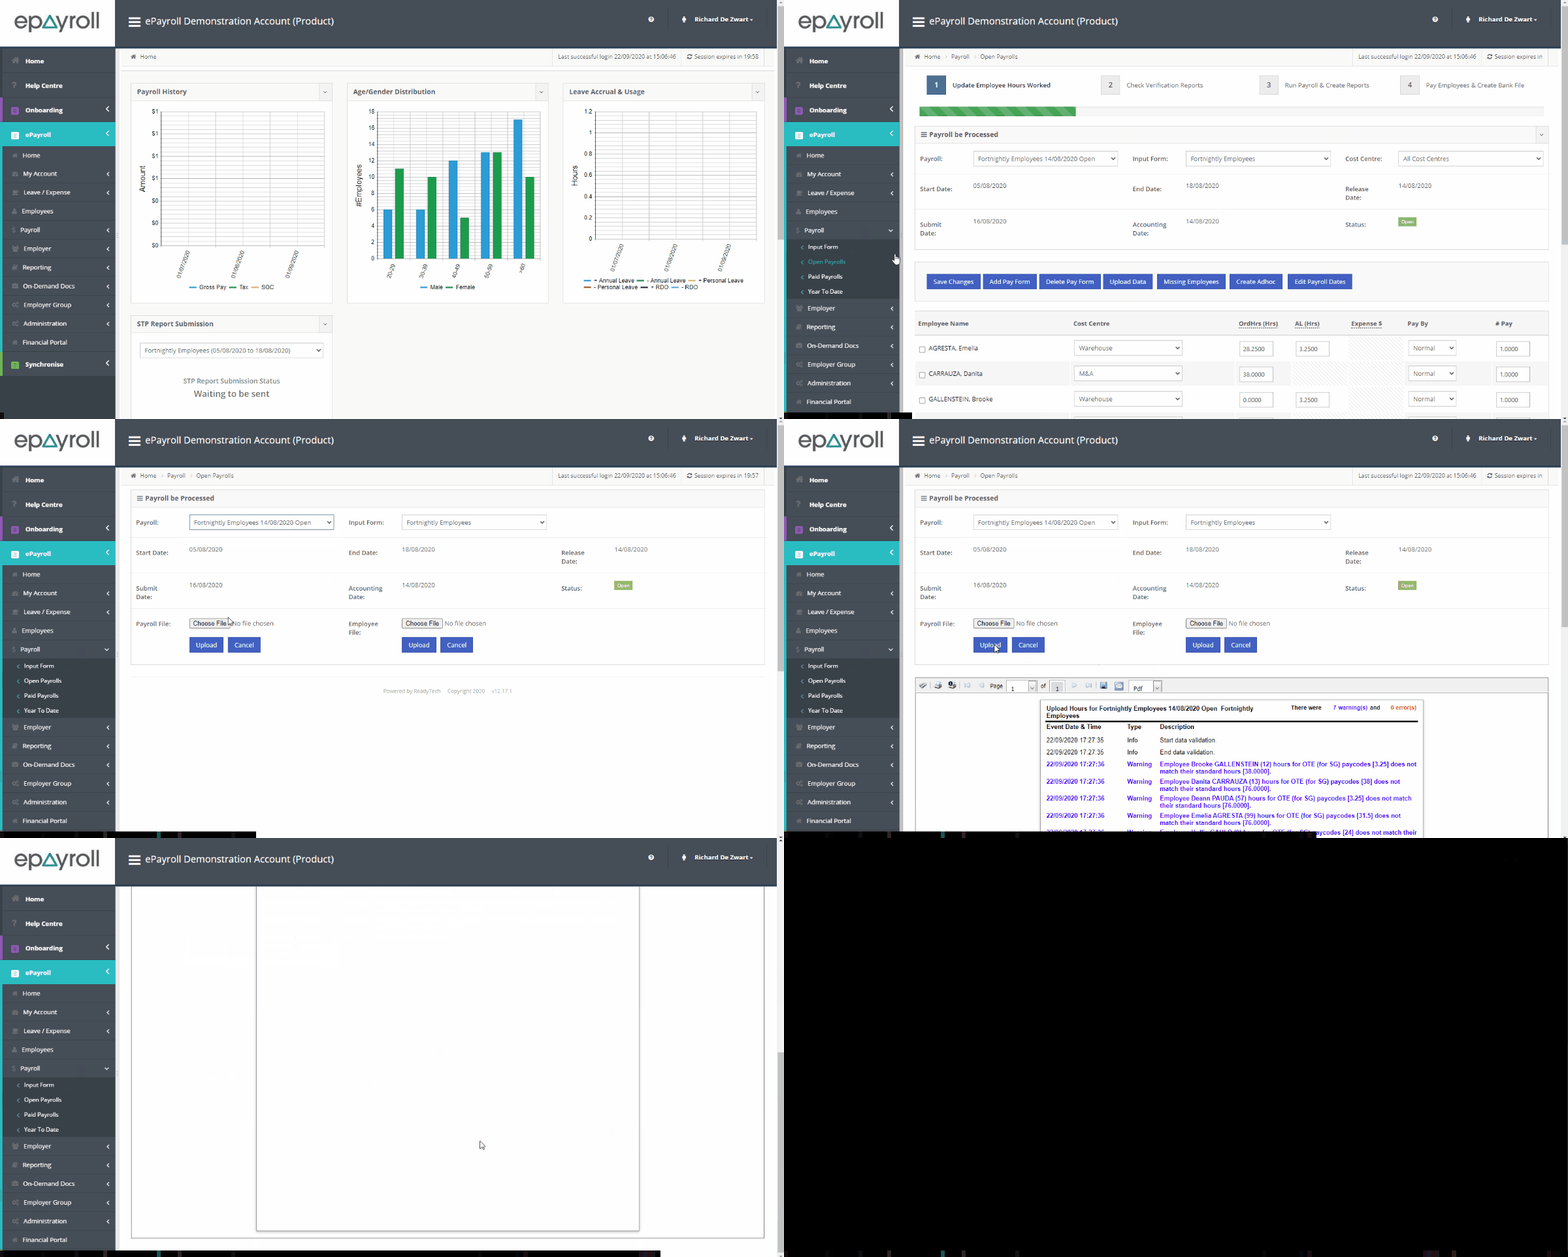
To import the file into Ready pay (powered by ePayroll), you will need to:
- Log into Ready pay (powered by ePayroll)
- Go to the Payroll -> Open Payrolls screen
- Click the Upload Data button
- If you have more than one pay cycle, ensure the correct payroll is selected in the Payroll dropdown
- In the Payroll File section, click the Choose File button and choose the file that you exported from Deputy
- In the Payroll File Section, click the Upload button
- Review the Event Listing for errors
After the file has been successfully imported without errors, you can run your payroll. Refer to the Processing a Normal Payroll help topic for more information about running your payroll.
Note: If there were any errors, they will need to be fixed and then the file will need to be imported again.
Note: When importing a file, it will typically override any data that is already in the payroll.
Common Import Errors
Truncation errors for all rows, listing ‘NumPays’ as the erroring column
Example:
Bulk load data conversion error (truncation) for row 1, column 9 (NumPays).Bulk load data conversion error (truncation) for row 2, column 9 (NumPays).Bulk load data conversion error (truncation) for row 3, column 9 (NumPays).Bulk load data conversion error (truncation) for row 4, column 9 (NumPays).Bulk load data conversion error (truncation) for row 5, column 9 (NumPays).Bulk load: An u
The file format on your account is incorrectly configured. Please contact the ePayroll Support Team to request your format be set to ‘CSV Format with Alt Rate’.
A single or couple of truncation errors only
Example:
Bulk load data conversion error (truncation) for row 3, column 3 (Paycode_ID) .Warning: Null value is eliminated by an aggregate or other SET operation.Warning:Null value is eliminated by an aggregate or other SET operation.Create Pay Sheet
One or more fields in your file are longer than is allowed. Code fields are usually limited to 10 characters, date fields are limited to 8 characters.
You will need to correct the file and any system where the file was produced, then upload it again.
Invalid Paycode ID
Example:
The Paycode_ID (1000077222) for employee (37) is not valid.
Either the paycode ID does not exist on your account or it exists but it is not available in the employee’s payment group. If the paycode ID does not exist, you will need to correct the configuration in the third party system where you produced the import file. If the paycode ID does exist on your account, ensure it is available in the affected employee’s payment group.
Date/Time conversion error
Example:
Conversion failed when converting date and/or time from character string.
This error indicates that there are one or more rows in the file which have an incorrectly formatted date. All date fields should be formatted as DDMMYYYY.
This error commonly occurs where a file has been opened/saved in Excel and leading zeros have been removed from a date. For example, 03/09/2020 should be in the file as 03092020 however if the file is opened then saved in Excel, Excel removes the leading zero and the value incorrectly becomes 3092020. In this case, you should either:
- Produce a new file to upload
- Manually edit the file in Notepad or Notepad++ to add in the missing leading zeros.

